
Stretch-mas Day 4: Cervical Retractions
Welcome back for day four of Stretch-mas! We hope that after these first few days, you’ve noticed some differences in how your back has been feeling! Now, it’s time to move on and start stretching some other parts of the body. Today’s focus is the neck, as we guide you through cervical retractions!
More About the Stretch
Just like day two, this exercise is part of the McKenzie Method of Diagnosis and Treatment. If you struggle with arthritis, herniated discs, poor posture, or a pinched nerve, this exercise may be a great help for you! For more details about the McKenzie Method you can visit our office to purchase the McKenzie Method “Treat Your Own Neck” book. This book is full of exercises and other tools to take control of your neck pain once and for all!
Step-By-Step Guide
To begin, start by sitting in a chair. After taking a seat, take a moment to assess your posture, placing your feet flat on the ground and sitting up tall. Find a point straight ahead on the horizon. Throughout the exercise, you should focus on the point you picked to keep your posture consistent.
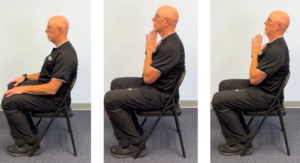
Next, slowly draw your chin back without tucking it down. If you feel like you are struggling with this, try placing your fingers under your chin and your thumb on your chest. When you move your neck, it should slide off your fingers as if you are pulling something off a shelf. Return to the starting position. You should repeat this exercise 10 times.
After 10 repetitions of this, slowly move your neck around and see if you can notice a difference. If you do, go for 2-3 more sets of 10 repetitions.
Progressions
Did that feel too easy? Then try these progressions! These variations will increase the stretch and help you get better results.

Progression 1 – Looking Up
Start the stretch the same way you originally did. Once you have brought your chin back,
instead of returning to your starting position,
slowly look up towards the ceiling while keeping your chin and neck retracted. After looking up as far as is comfortable, slowly return your head to your fixed point in front of you before releasing the stretch.
Progression 2 – The Wiggle
Once you feel comfortable with holding the stretch while looking up, you can add one more step to this exercise. Start the same way you did with the first progression by performing the retraction and then looking up. Now, you can gently wiggle side to side as if you are trying to use your nose to trace a short line on the ceiling. Continue this for about three seconds before bringing your head back down and releasing the stretch.
Final Notes
This is a great exercise that you can do anywhere to relieve stiffness in the neck. If you noticed a difference after trying this stretch, we recommend aiming to complete this exercise twice a day.
Ready for more? Review our previous days or come back tomorrow to learn the hip flexor stretch!

All of us will fall during our lifetimes. For older adults, falls can more easily result in serious and potentially life-threatening injuries. The…

A fall can result in unwanted outcomes, including injury, loss of independence, and a decreased ability to do the things that are most important to…